Quarkus - Develop Your First Supersonic Enterprise Java Application
In this article, we're going to getting started with our first supersonic Quarkus application. We will develop a RESTful application using the familiar JAX-RS and CDI APIs, learn how to run it in a Quarkus environment and see how to test it.

Last week, Quarkus 1.0 has been announced, an important milestone for the Java community.
Quarkus is an Open Source stack to write Java applications offering unparalleled startup time, memory footprint and developer experience. It offers familiar programming models and APIs (Hibernate, JAX-RS, Eclipse Vert.x, Apache Camel, Eclipse MicroProfile, Spring API compatibility and more).
I couldn't help trying out immediately the Candidate Release 1 for Quarkus 1.0 and writing about it.
In this article, we're going to getting started with our first Quarkus application, more specifically a RESTful application using the familiar JAX-RS and CDI APIs from Jakarta EE. We will also see how to test our application. You can find the source code on my GitHub.
1. Prerequisites
To follow along with this tutorial, you will need:
- JDK 8 or 11+
- an IDE
- Apache Maven 3.5.3+
- Gradle 5.5.0+
I will use Gradle to build the application, but you're free to use Maven. Be aware that using Gradle with Quarkus is preview functionality. It might not support all the possible scenarios, but it works well enough for the application we are going to build in this tutorial.
2. Bootstrapping a Quarkus Application
The application that we are going to develop is a fictitious RESTful application for a library, which exposes an endpoint to fetch all the available books.
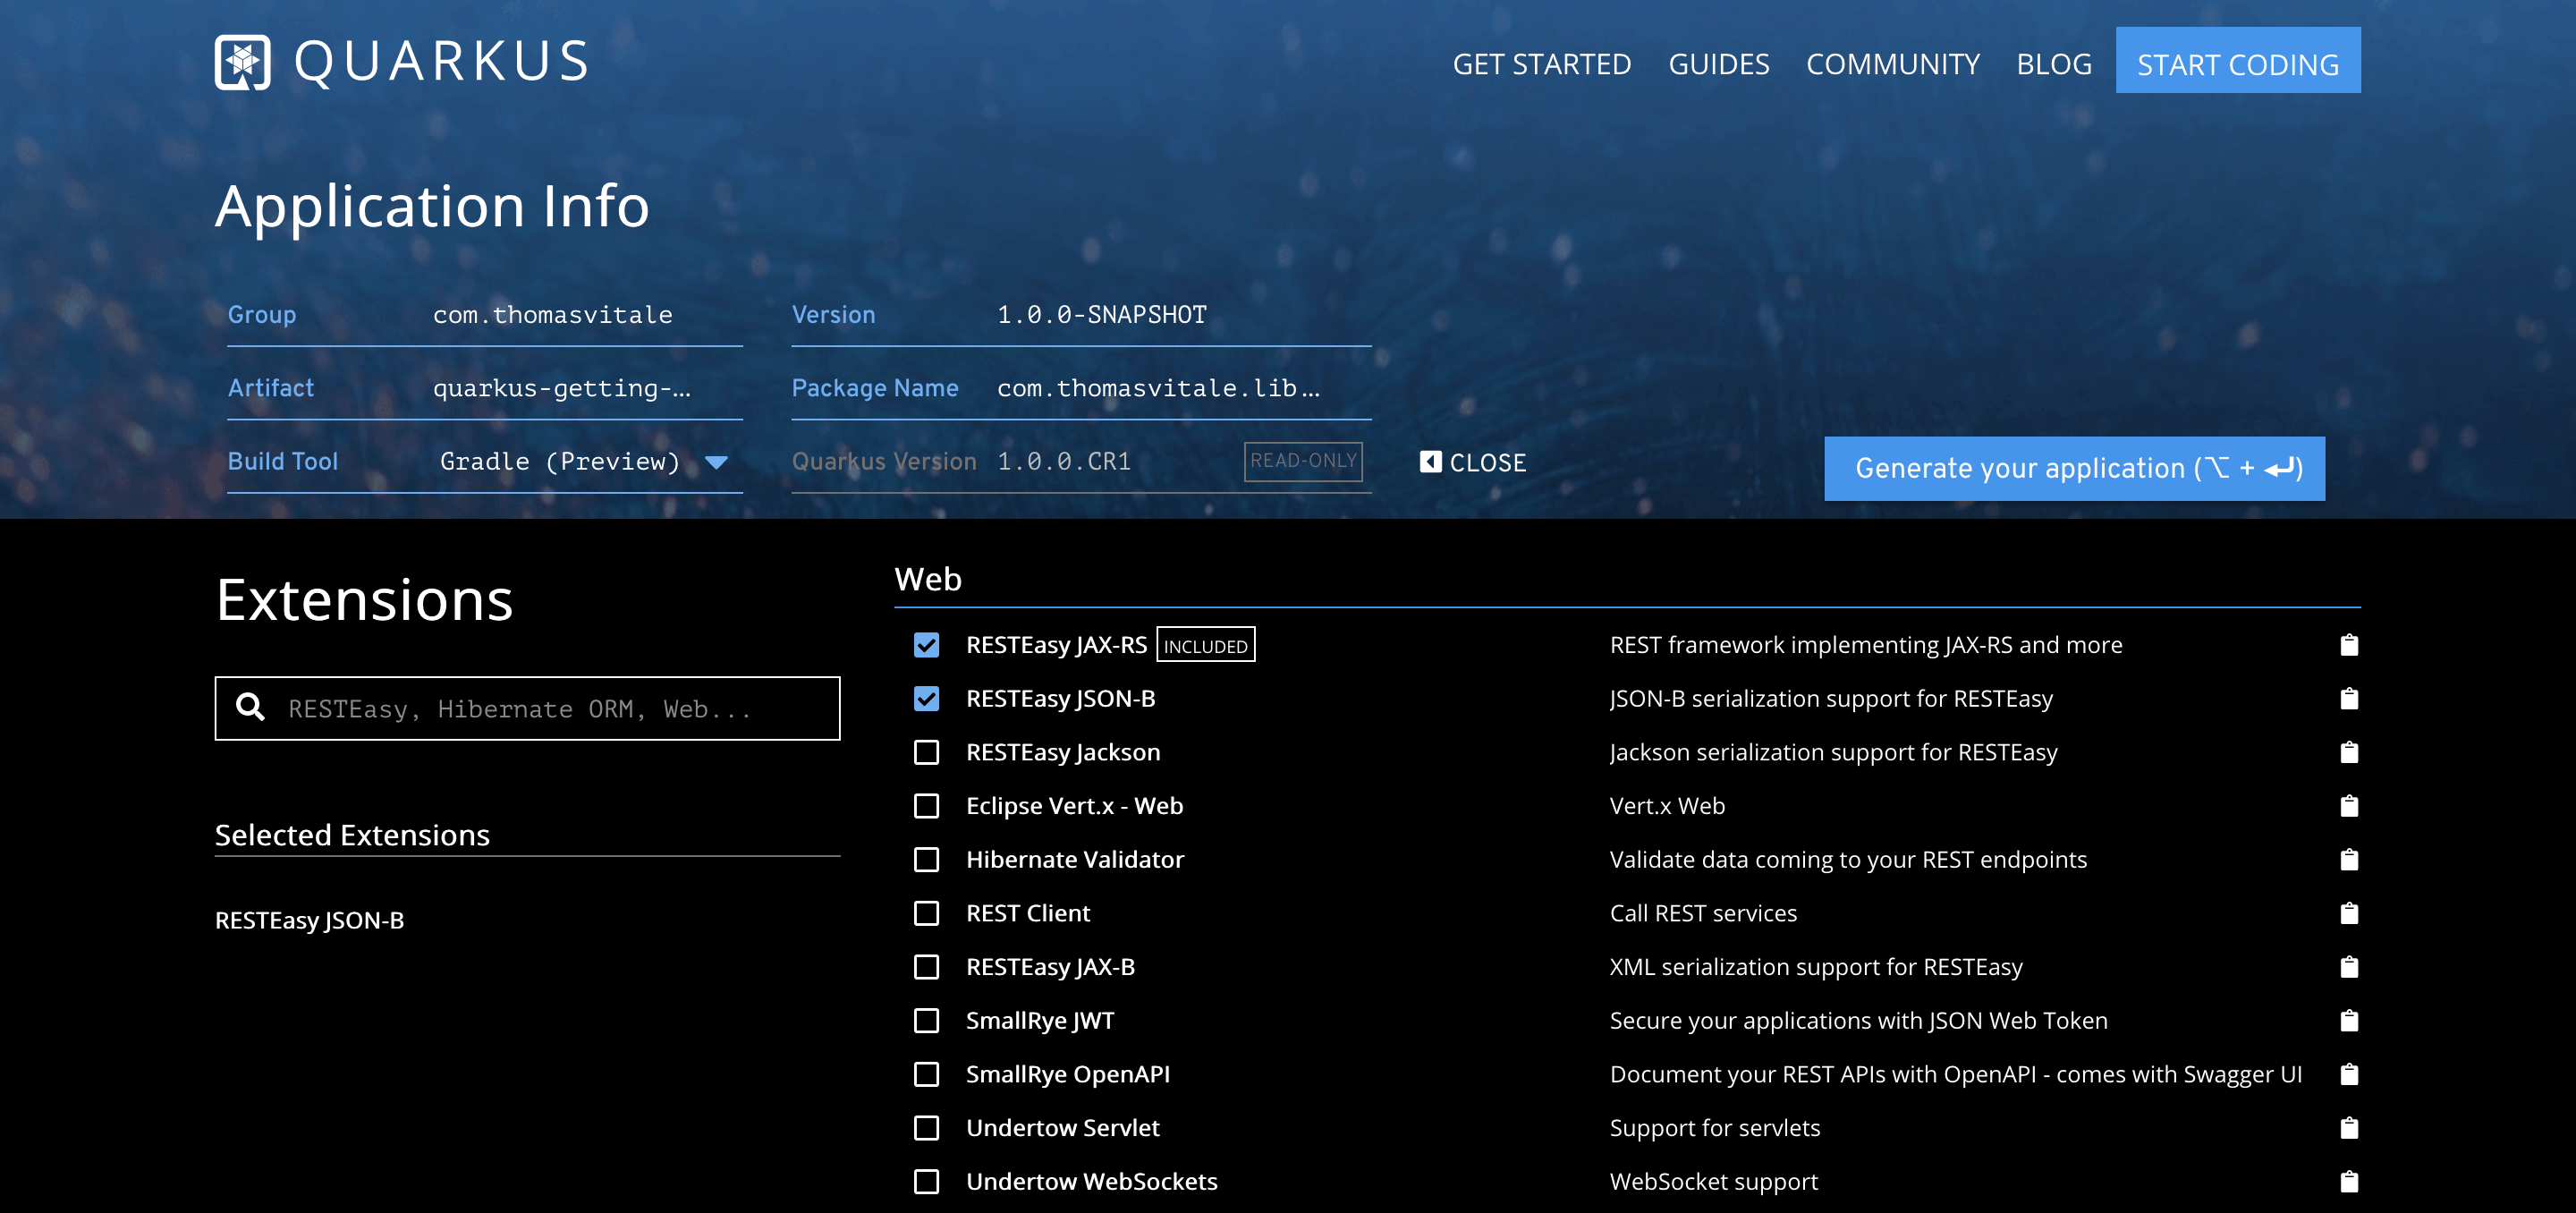
We can quickly bootstrap a Quarkus application in two ways: leveraging Maven from the command line or using the convenient UI-based application generator.
In both cases, we need to provide some important information:
- group and artifact ids
- build tool (Maven or Gradle)
- extensions (i.e. dependencies).
The RESTeasy JAX-RS extension is included by default, while we need to include the RESTeasy JSON-B extension explicitly.
Using the Maven generator, we can also specify a resource class to be automatically generated and configured for JAX-RS and an optional path.
Let's have a look at both the options.
Using Maven to generate a Quarkus application
Let's open a Terminal window and run the following command to generate an application which will use Maven as a built tool:
mvn io.quarkus:quarkus-maven-plugin:1.0.0.CR1:create \
    -DprojectGroupId=com.thomasvitale \
    -DprojectArtifactId=quarkus-getting-started \
    -DclassName="com.thomasvitale.library.BookResource" \
    -Dpath="/books" \
-Dextensions="resteasy-jsonb"Should we prefer to use Gradle as the tool to build our application, we can do so in this way (notice the extra buildTool parameter):
mvn io.quarkus:quarkus-maven-plugin:1.0.0.CR1:create \
    -DprojectGroupId=com.thomasvitale \
    -DprojectArtifactId=quarkus-getting-started \
    -DclassName="com.thomasvitale.library.BookResource" \
    -Dpath="/books" \
    -Dextensions="resteasy-jsonb" \
-DbuildTool=gradleUsing the UI-based initializer to generate a Quarkus application
In alternative to Maven, we can go to code.quarkus.io and create our Quarkus application from a convenient user interface where to insert all the details about the project, the build tool and the extensions we need. Are you familiar with the Spring Initializr? This tool works in the same way.
3. The Structure of a Quarkus Application
The basic structure of the generated Quarkus application follows the Maven standard. On top of that, there are some extra features.
As defined in the previous section, we can notice that the BookResource class has been generated in src/main/java, together with test classes in src/test/java and src/native-test/java. The first tests are run in JVM mode, the second in native mode. The BookResource is exposed to the /books endpoint and accessible by default on http://localhost:8080.
In src/main/docker, we can find example Dockerfile files to run our application in a container, either in JVM or native mode.
To easily build the application, a Quarkus plugin is applied (either for Maven or Gradle), and a Quarkus BOM is imported to define which version we want to use throughout the application.
In the dependencies section of our gradle.build file (or pom.xml if using Maven), we can find the RESTeasy extensions that we defined for the generator, plus JUnit5 and RestAssured to test our application both in JVM and native mode.
dependencies {
    implementation 'io.quarkus:quarkus-resteasy-jsonb'
    implementation 'io.quarkus:quarkus-resteasy'

    testImplementation 'io.quarkus:quarkus-junit5'
    testImplementation 'io.rest-assured:rest-assured'

    nativeTestImplementation 'io.quarkus:quarkus-junit5'
    nativeTestImplementation 'io.rest-assured:rest-assured'
}4. JVM vs Native Mode
In the previous section, we mentioned a few times JVM and native modes. Some clarification is in order.
The JVM mode exploits the standard JVM. It tailors the runtime such that it includes only what the application actually needs, removing all the extra dynamics of a standard enterprise runtime. This results in lower memory consumption, and a faster boot phase and first response time comparing to a traditional enterprise application.
The Quarkus JVM mode is already a significant advantage over the traditional enterprise Java application. In reality, what makes Quarkus shines is its native mode. Quarkus has been designed around a container first philosophy, with native support for GraalVM and SubstrateVM. When using this mode, our applications are pre-built and compiled to native executables which start up almost immediately and are incredibly well-performant both in terms of time and memory consumption.
In this tutorial, we're going to run the application and its tests in JVM mode. In a future article, instead, we will see how the native mode works.
5. Implementing the REST API
Now, let's get started with the actual development phase. A BookResource class has been generated for us. It's time to implement some endpoints.
We're going to expose two endpoints:
/booksreturns the list of books available in the library;/books/{id}returns the book having the specified id.
@Path("/books")
@Produces(MediaType.APPLICATION_JSON)
public class BookResource {

    @Inject
    BookService bookService;

    @GET
    public List<Book> getBooks() {
        return bookService.getBooks();
    }

    @GET
    @Path("{id}")
    public Book getBookById(@PathParam("id") Long id) {
        return bookService.getBookById(id);
    }
}It's interesting to notice that, differently from vanilla JAX-RS as used in Jakarta EE, in Quarkus we don't need to define an Application class annotated with @ApplicationPath to enable the REST API. Also, by default, the resource class is configured as @ApplicationScoped. You can change the configuration by using the familiar annotations from CDI to define the scope of a class.
The functionality to retrieve books is delegated to the BookService class, which is injected as a CDI bean in BookResource. The service defines a static map to simulate a book repository.
@ApplicationScoped
public class BookService {

    private static Map<Long, Book> bookRepository = new ConcurrentHashMap<>();

    static {
        bookRepository.put(1L, new Book(1L, "Harry Potter"));
        bookRepository.put(2L, new Book(2L, "The Lord of The Rings"));
        bookRepository.put(3L, new Book(3L, "The Golden Compass"));
    }

    List<Book> getBooks() {
        return new ArrayList<>(bookRepository.values());
    }

    Book getBookById(Long id) {
        return bookRepository.get(id);
    }
}Finally, the Book class is a POJO.
public class Book {
    private Long id;
    private String title;

    Book(Long id, String title) {
        this.id = id;
        this.title = title;
    }

    public Long getId() {
        return id;
    }

    public void setId(Long id) {
        this.id = id;
    }

    public String getTitle() {
        return title;
    }

    public void setTitle(String title) {
        this.title = title;
    }
}6. Running the Quarkus Application
It's time to run our Quarkus application for the first time. Ready for some supersonic subatomic deployment?
Let's open a Terminal window and run the command:
./gradlew assemble quarkusDevIf using Maven, we can run the command:
./mvnw compile quarkus:devThe quarkusDev task (or quarkus:dev when using Maven) runs Quarkus in development mode. The main feature of this mode is the hot deployment with background compilation, which means we can modify our source files (both Java classes and resources) while the application is running and the changes will automatically take effect.
When running Quarkus in development mode, the debug mode is enabled by default, listening to port 5005 without suspending the JVM.
Now, let's verify if it's working. From the Terminal, let's call our brand new REST API:
curl http://localhost:8080/books/1This is the result:
{"id":1,"title":"Harry Potter"}Great, it's working!
7. Testing
We manually verified that our REST endpoints are correctly exposed to our Quarkus application, but it's better to write some autotests.
Let's use the BookResourceTest class in src/test/java that has been already generated for us and let's write a couple of tests for the two endpoints exposed by the BookResource class. As mentioned before, we're going to use JUnit5 and RestAssured to write our tests.
@QuarkusTest
public class BookResourceTest {

    @Test
    void testGetBooks() {
        given()
            .when().get("/books")
            .then()
                .statusCode(200)
                .body("id", hasItems(1, 2, 3));
    }

    @Test
    void testGetBookById() {
        given()
          .pathParam("id", 1)
          .when().get("/books/{id}")
          .then()
             .statusCode(200)
             .body("id", is(1));
    }
}The @QuarkusTest annotation makes sure that the application is running before starting the tests.
Tests can be run either directly from our IDE or our build tool. If we use Gradle:
./gradlew testWith Maven, instead, we run the following command:
./mvnw testSuper! We now also have autotests ensuring that our application works as intended.
Conclusion
In this article, we have had a first look at Quarkus. We have explored the different ways to generate a basic Quarkus project and went through its structure to identify all the main parts of the application. Then, we have implemented a simple RESTful application leveraging the familiar JAX-RS and CDI APIs for enterprise Java and learned how to run a Quarkus application in development mode. Finally, we have ensured that the application has been implemented correctly by writing some autotests and learned how to run them.
Quarkus is definitely here to stay, and I'm looking forward to seeing how it will change the enterprise Java application landscape. And you? Let me know what you think about Quarkus and if you're considering starting using it for your future projects.
If you're interested in cloud native development with Spring Boot and Kubernetes, check out my book Cloud Native Spring in Action.