Spring Data JPA using Hibernate and Java Configuration with Annotations
Spring Data JPA makes it very easy to implement JPA-based repositories. In this tutorial, I’ll show you how to use it to integrate a relational database (PostgreSQL in my example) with a Spring Boot application.


Spring Data JPA makes it very easy to implement JPA-based repositories. In this tutorial, I’ll show you how to use it to integrate a relational database (PostgreSQL in my example) with a Spring Boot application.

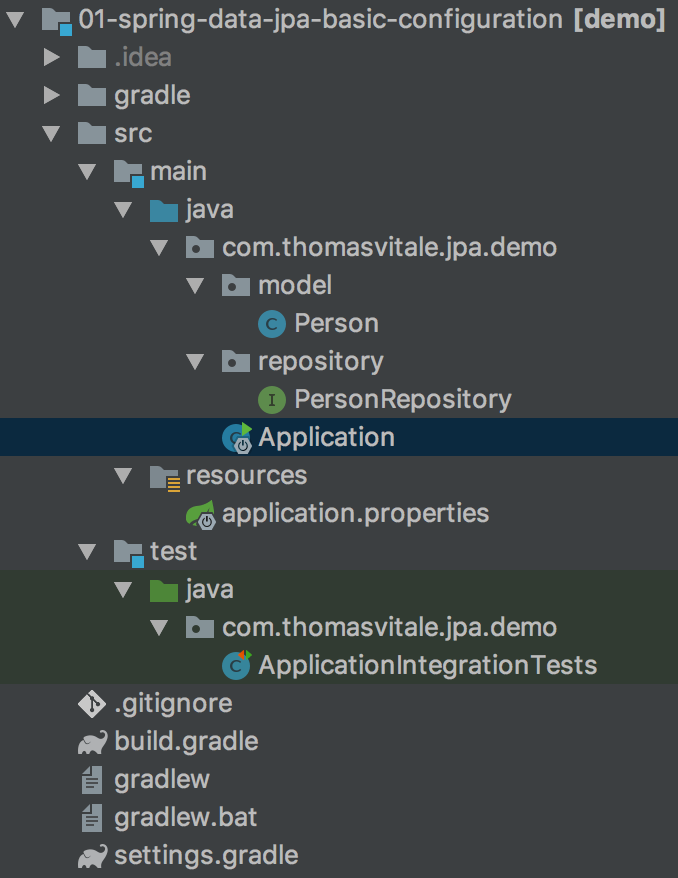
1. The Project Structure
Before starting, I want to show you the final project structure for your reference. At the end of this tutorial, you should end up with something like this.
Throughout the tutorial I'm going to use the following:
- Spring Boot 2.0.x
- Gradle 4.10.x
- PostgreSQL 10.5.
2. Dependencies
First, I'll create a new Spring Boot project with JPA and PostgreSQL as dependencies. You can easily bootstrap your application with the Spring Initializr. Here how the gradle.build file looks like:
buildscript {
    ext {
        springBootVersion = '2.0.5.RELEASE'
    }
    repositories {
        mavenCentral()
    }
    dependencies {
        classpath("org.springframework.boot:spring-boot-gradle-plugin:${springBootVersion}")
    }
}

apply plugin: 'java'
apply plugin: 'eclipse'
apply plugin: 'org.springframework.boot'
apply plugin: 'io.spring.dependency-management'

group = 'com.thomasvitale.jpa'
version = '0.0.1-SNAPSHOT'
sourceCompatibility = 1.8

repositories {
    mavenCentral()
}

dependencies {
    implementation('org.springframework.boot:spring-boot-starter-data-jpa')
    runtimeOnly('org.postgresql:postgresql')

    testImplementation('org.springframework.boot:spring-boot-starter-test')
    testRuntimeOnly('org.postgresql:postgresql')
}
If you want to use a different database, replace the PostgreSQL with the one you need, for example, MySQL.
runtimeOnly('mysql:mysql-connector-java')
testRuntimeOnly('mysql:mysql-connector-java')
I'm using Gradle to manage these dependencies, but you're free to use Maven instead.
3. JPA Configuration
The easiest way to configure a data source in Spring Boot is by defining some values in the application.properties file and rely on its default behaviour. There are a few implementations of JPA: in this example, I'm using Hibernate.
# DATASOURCE (DataSourceAutoConfiguration & DataSourceProperties)

# JDBC URL of the database.
spring.datasource.url=jdbc:postgresql://localhost:12345/app
# Login username of the database.
spring.datasource.username=username
# Login password of the database.
spring.datasource.password=password

# JPA (JpaBaseConfiguration, HibernateJpaAutoConfiguration)

# DDL mode. This is actually a shortcut for the "hibernate.hbm2ddl.auto" property. Defaults to "create-drop" when using an embedded database and no schema manager was detected. Otherwise, defaults to "none".
spring.jpa.hibernate.ddl-auto=update
# Whether to enable logging of SQL statements.
spring.jpa.show-sql=true

# Hibernate additional native properties to set on the JPA provider.
spring.jpa.properties.hibernate.dialect=org.hibernate.dialect.PostgreSQLDialect
spring.jpa.properties.hibernate.current_session_context_class=thread
spring.jpa.properties.hibernate.format_sql=true

# Fix Postgres JPA Error (Method org.postgresql.jdbc.PgConnection.createClob() is not yet implemented).
spring.jpa.properties.hibernate.jdbc.lob.non_contextual_creation=true
If you're not using PostgreSQL, remember to specify the connection URL and the Hibernate dialect for your database on lines 4 and 18 respectively. Refer to the official documentation to find out all the dialects supported by Hibernate.
4. Data Model
My application allows storing information about people into a database. To collect this information, I need a data model Person. The @Entity annotation let Spring know that the Person class is actually representing a table in my database.
@Entity
@Table(name = "persons")
public class Person {

	@Id
	@GeneratedValue(strategy = GenerationType.AUTO)
	private Integer id;

	@Column(name = "first_name", nullable = false)
	private String firstName;

	@Column(name = "last_name", nullable = false)
	private String lastName;

	@Column(name = "ssn", nullable = false, unique = true)
	private String ssn;

	public Person() {
	}

	public Person(String firstName, String lastName) {
		this.firstName = firstName;
		this.lastName = lastName;
	}

	public Person(String firstName, String lastName, String ssn) {
		this(firstName, lastName);
		this.ssn = ssn;
	}

	public Integer getId() {
		return id;
	}

	public void setId(Integer id) {
		this.id = id;
	}

	public String getFirstName() {
		return firstName;
	}

	public void setFirstName(String firstName) {
		this.firstName = firstName;
	}

	public String getLastName() {
		return lastName;
	}

	public void setLastName(String lastName) {
		this.lastName = lastName;
	}

	public String getSsn() {
		return ssn;
	}

	public void setSsn(String ssn) {
		this.ssn = ssn;
	}

	@Override
	public String toString() {
		return firstName + " " + lastName;
	}
}
Through the @Table(name = "persons") annotation, I can declare the name of the table corresponding to this data model.
The @Id annotation defines the id field as the primary key. The @GeneratedValue(strategy = GenerationType.AUTO) annotation is used to delegate the database to pick an appropriate strategy for the primary key generation.
With the @Column annotation, I can associate a field with specific constraints. In the example, I'm using it to make some fields not nullable and to make the social security number field unique.
5. Data Repository
After defining a data entity, I need a repository to query my database and perform operations on my data. The PersonRepository class extends the JpaRepository interface, which provides a lot of operations out-of-the-box, including the standard CRUD operations.
You can also add custom operations. I'm going to define methods to query people data by first name, last name and social security number. The best part of it? Spring Data JPA creates them for me, no implementation required. Awesome!
@Repository
public interface PersonRepository extends JpaRepository<Person, Integer> {
	List<Person> findByFirstName(String firstName);
	List<Person> findByLastName(String lastName);
	Person findBySsn(String ssn);
}
The @Repository annotation makes the class auto-detectable as a data repository.
6. Application
The entry point of my application is the Application class, annotated as @SpringBootApplication.
@SpringBootApplication
public class Application {

	public static void main(String[] args) {
		SpringApplication.run(Application.class, args);
	}
}
7. Demo
Let's try some CRUD and custom operations to test the application.
@RunWith(SpringRunner.class)
@SpringBootTest
public class ApplicationIntegrationTests {

	@Autowired
	private PersonRepository personRepository;

	@Before
	public void setUp() {
		// Save 4 Person objects into the database
		personRepository.save(new Person("Sheldon", "Cooper", "123456"));
		personRepository.save(new Person("Missy", "Cooper", "234567"));
		personRepository.save(new Person("Leonard", "Hofstadter", "345678"));
		personRepository.save(new Person("Leonard", "Nimoy", "456789"));
	}

	@After
	public void cleanUp() {
		// Delete all test data
		personRepository.deleteAll();
	}

	@Test
	public void testCRUD() {
		// Create
		Person originalPerson = new Person("Howard", "Wolowitz", "654321");
		personRepository.save(originalPerson);
		Person createdPerson = personRepository.findBySsn("654321");

		assertEquals(originalPerson.getFirstName(), createdPerson.getFirstName());
		assertEquals(originalPerson.getLastName(), createdPerson.getLastName());
		assertEquals(originalPerson.getSsn(), createdPerson.getSsn());

		// Update
		createdPerson.setFirstName("Fruit Loops");
		personRepository.save(createdPerson);
		Person updatedPerson = personRepository.findBySsn("654321");

		assertEquals(createdPerson.getFirstName(), updatedPerson.getFirstName());

		// Delete
		personRepository.delete(updatedPerson);

		assertNull(personRepository.findBySsn("654321"));
	}

	@Test
	public void testFindAll() {
		// Get all the people
		List<Person> people = personRepository.findAll();

		assertEquals(4, people.size());
	}

	@Test
	public void testFindByFirstName() {
		// Get all the people with a specific first name
		List<Person> people = personRepository.findByFirstName("Leonard");

		assertEquals(2, people.size());
	}

	@Test
	public void testFindByLastName() {
		// Get all the people with a specific last name
		List<Person> people = personRepository.findByLastName("Cooper");

		assertEquals(2, people.size());
	}
}
8. Behind The Scenes: More Control
In the previous example, I relied on the default configuration provided by Spring Data. To get more control, I can either use Java configuration or XML configuration or a mix of the two. I prefer a pure Java configuration.
The following configuration produces the same result as the previous example. Quite useless. However, I wanted to show it to you since I think it provides a better understanding of what's going on behind the scenes.
@Configuration
@EnableTransactionManagement
@EnableJpaRepositories(basePackages = "com.thomasvitale.jpa.demo.repository")
public class JpaConfig {

	@Autowired
	private Environment env;

	@Bean
	public LocalContainerEntityManagerFactoryBean entityManagerFactory() {

		HibernateJpaVendorAdapter vendorAdapter = new HibernateJpaVendorAdapter();
		vendorAdapter.setDatabase(Database.POSTGRESQL);
		vendorAdapter.setGenerateDdl(true);

		LocalContainerEntityManagerFactoryBean em = new LocalContainerEntityManagerFactoryBean();
		em.setDataSource(dataSource());
		em.setPackagesToScan("com.thomasvitale.jpa.demo.model");
		em.setJpaVendorAdapter(vendorAdapter);
		em.setJpaProperties(additionalProperties());

		return em;
	}

	@Bean
	public DataSource dataSource() {
		DriverManagerDataSource dataSource = new DriverManagerDataSource();
		dataSource.setDriverClassName("org.postgresql.Driver");
		dataSource.setUrl(env.getProperty("spring.datasource.url"));
		dataSource.setUsername(env.getProperty("spring.datasource.username"));
		dataSource.setPassword(env.getProperty("spring.datasource.password"));
		return dataSource;
	}

	@Bean
	public PlatformTransactionManager transactionManager(EntityManagerFactory emf) {
		JpaTransactionManager transactionManager = new JpaTransactionManager();
		transactionManager.setEntityManagerFactory(emf);

		return transactionManager;
	}

	@Bean
	public PersistenceExceptionTranslationPostProcessor exceptionTranslation() {
		return new PersistenceExceptionTranslationPostProcessor();
	}

	private Properties additionalProperties() {
		Properties properties = new Properties();
		properties.setProperty("hibernate.hbm2ddl.auto", env.getProperty("spring.jpa.hibernate.ddl-auto"));
		properties.setProperty("hibernate.dialect", env.getProperty("spring.jpa.properties.hibernate.dialect"));
		properties.setProperty("hibernate.current_session_context_class", env.getProperty("spring.jpa.properties.hibernate.current_session_context_class"));
		properties.setProperty("hibernate.jdbc.lob.non_contextual_creation", env.getProperty("spring.jpa.properties.hibernate.jdbc.lob.non_contextual_creation"));
		properties.setProperty("hibernate.show_sql", env.getProperty("spring.jpa.show-sql"));
		properties.setProperty("hibernate.format_sql", env.getProperty("spring.jpa.properties.hibernate.format_sql"));
		return properties;
	}
}
If you're not using PostgreSQL, remember to specify the adapter and the driver for your database on lines 33 and 48 respectively.
This kind of configuration comes in handy when we need to customise the JPA configuration, for example, if we want to configure multiple DataSources or multiple EntityManagers. I will write about more advanced configurations in a future article.
9. Conclusion
In this article, I have shown how to configure in a basic way Spring Data JPA to integrate a relational database with a Spring Boot application.
You can find the complete source code on GitHub.
References
Last Update: 30 Sep 2018
If you're interested in cloud native development with Spring Boot and Kubernetes, check out my book Cloud Native Spring in Action.