Centralized Configuration with Spring Cloud Config
Learn how to build a central config server with Spring Cloud Config, configure a Spring Boot application with it, and refresh the config at runtime.


Spring Cloud Config provides support for centralized configuration in a distributed environment. In this article, we're going to learn how to build a centralized config server and how to use it to configure a Spring Boot application.
1. Prerequisites
To follow along with this tutorial, you will need:
- JDK 17
- an IDE
- Gradle 7.2
- Spring Boot 2.6
If you prefer to use Apache Maven rather than Gradle, feel free to do so.
On GitHub, you can find the source code for the application we are building in this tutorial.
2. Configuration for Cloud-Native Applications
Before looking at the Spring Cloud Config project, let's agree upon what "configuration" means. The Twelve-Factor App Methodology defines it in this way:
An app’s config is everything that is likely to vary between deploys (staging, production, developer environments, etc).
For example, the configuration includes credentials to external services, resource handles to databases, values that change at every deployment like canonical hostnames.
In Spring Boot, we typically define those values in application.properties or application.yml files.
2.1 Configuration in the Environment
The third factor of the Twelve-Factor App Methodology establishes that the configuration should be stored in the environment. The reason is that we want to be able to change the configuration of our application without the need to rebuild it. If it's stored in the environment as environment variables, we can deploy the same executable with the ability to change the configuration at each deploy.
In Spring Boot, we can have default configuration values stored in application.properties or application.yml files, which are useful during the development phase. Then, every time we deploy the application, we can overwrite them through environment variables. For more information about it, I suggest you read the Externalized Configuration chapter from the Spring Boot documentation.
2.2 Configuration in the Cloud
Depending on the requirements of our applications, storing the configuration in the environment might not be the best option. For example, if we needed to configure multiple microservices in similar ways, or to change the configuration at runtime.
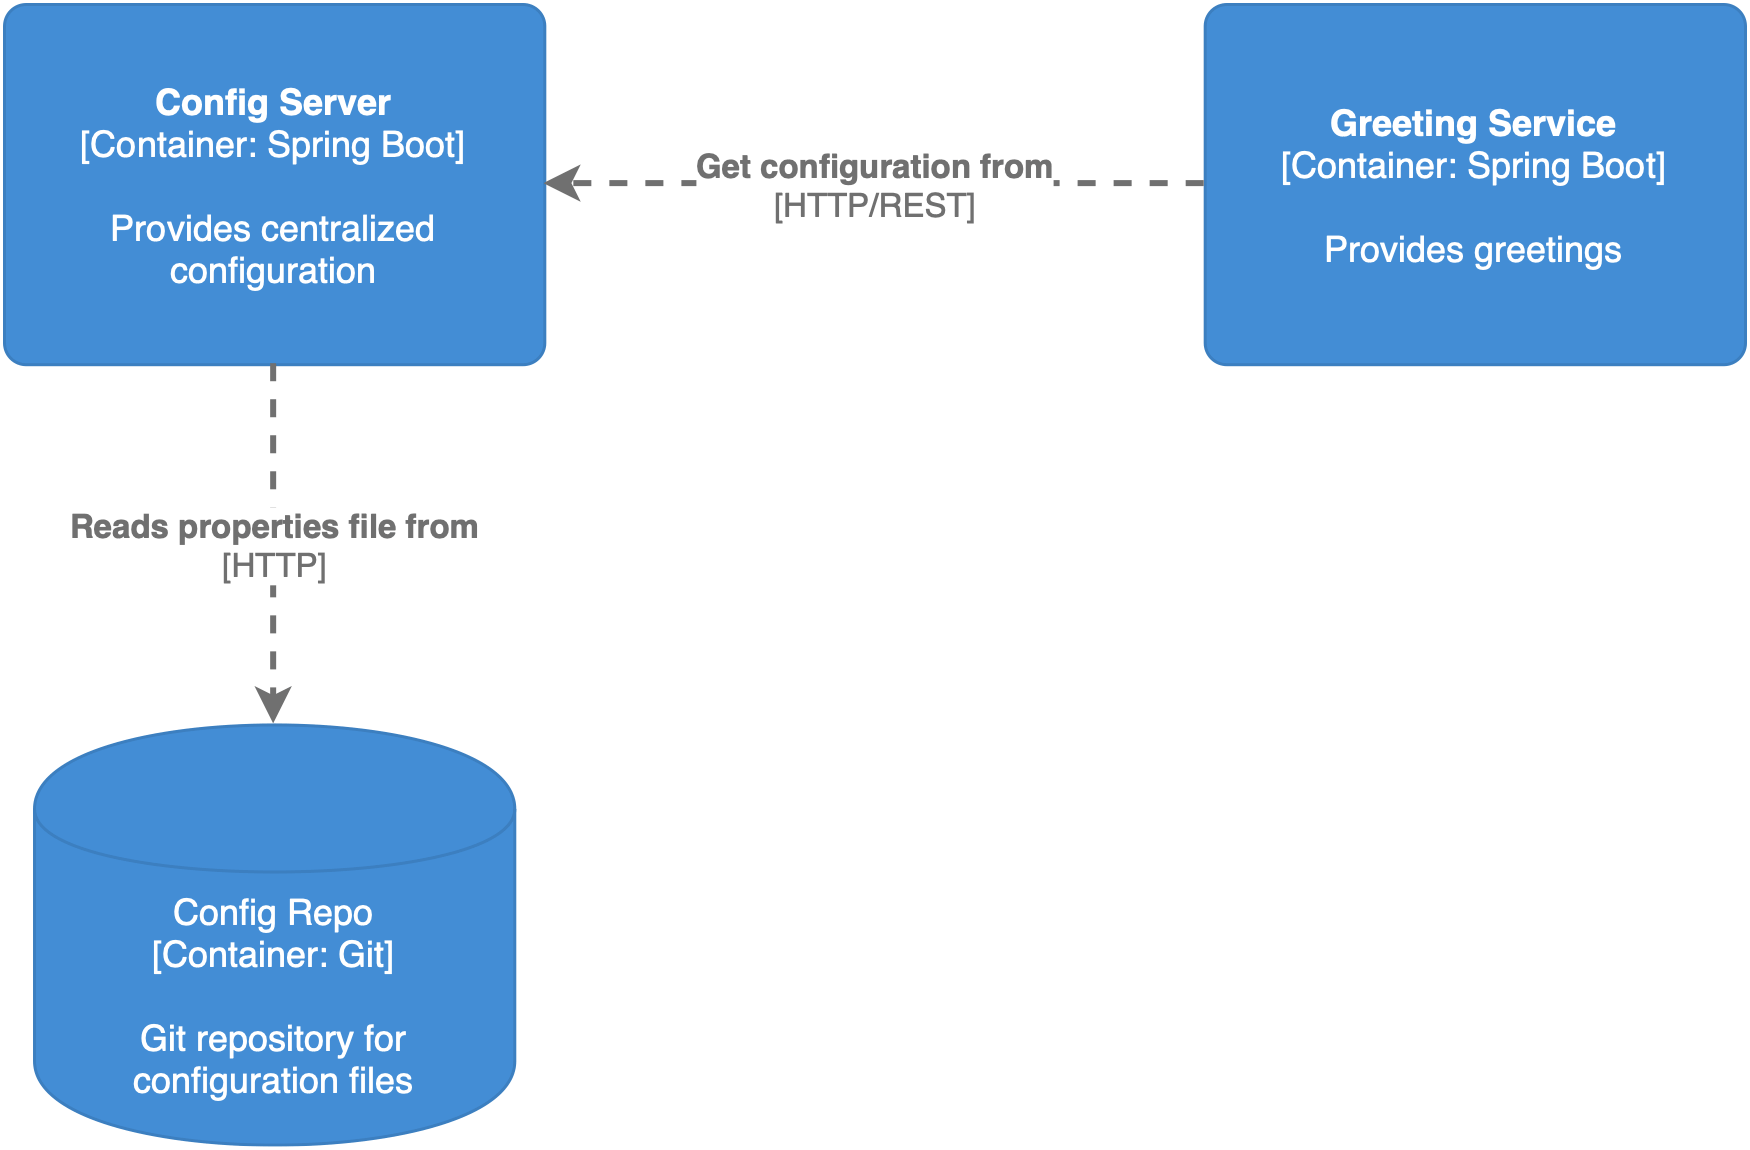
That is when Spring Cloud Config comes handy. The idea is to set up an external, centralized server responsible for providing configuration to multiple services.
From the project documentation:
Spring Cloud Config provides server and client-side support for externalized configuration in a distributed system. With the Config Server you have a central place to manage external properties for applications across all environments.
In the following, we're going to build a configuration server (using Spring Cloud Config Server), configure a Spring Boot application from it (using Spring Cloud Config Client), and explore some useful features like refreshing mechanisms to change the configuration at runtime.
3. Spring Cloud Config Server
In this section, we're going to build a configuration server with Spring Cloud Config Server, embedded in a Spring Boot application.
3.1 Set up project and dependencies
Our Config Server, on top of Spring Boot, will make use of one central library: spring-cloud-config-server. Let's define it in the gradle.build file for our project (or pom.xml if using Maven).
Notice that for Spring Cloud, we are using a BOM (Bill of Materials) identified by a year (2021.0.0-M3) rather than a standard version number like we do for Spring Boot. If you're curious about why we do that, you can find out how the Spring Cloud release trains work.
plugins {
    id 'org.springframework.boot' version '2.6.0-M3'
    id 'io.spring.dependency-management' version '1.0.11.RELEASE'
    id 'java'
}

group = 'com.thomasvitale'
version = '0.0.1-SNAPSHOT'
sourceCompatibility = '17'

repositories {
    mavenCentral()
    maven { url 'https://repo.spring.io/milestone' }
}

ext {
    set('springCloudVersion', "2021.0.0-M3")
}

dependencies {
    implementation 'org.springframework.cloud:spring-cloud-config-server'
    testImplementation 'org.springframework.boot:spring-boot-starter-test'
}

dependencyManagement {
    imports {
        mavenBom "org.springframework.cloud:spring-cloud-dependencies:${springCloudVersion}"
    }
}

test {
    useJUnitPlatform()
}3.2 Enable config server
The next step is enabling the config server. We can achieve that by using the @EnableConfigServer annotation.
@SpringBootApplication
@EnableConfigServer
public class ConfigServerApplication {

    public static void main(String[] args) {
        SpringApplication.run(ConfigServerApplication.class, args);
    }
}That's it. No more Java code is required. Pretty cool, huh?
3.3 Define the Environment Repository
Now we need a way to store the configuration data so that our config server could read them and serve them. Spring Cloud Config Server relies on an EnvironmentRepository that returns Environment objects, which are, in turn, sent to the applications registered to be configured by the config server.
Various implementations of EnvironmentRepository are available, using different back-end services like JDBC, Redis, Vault, and AWS S3. The default one uses a Git back-end. That's the strategy that we're going to explore in this article.
First, let's create an empty Git repository. For simplicity, we'll create a local one. From a Terminal window, we can run the following commands:
cd $HOME
mkdir config-repo
git init config-repoThe configuration data in the repo should follow some specific rules that we will analyze later. For the moment, the only thing we need to know is that the configuration is stored in familiar Spring property files.
So, we can go ahead and create a property file in the repository, with our first externalized configuration.
cd config-repo
echo "greeting: Hello Cloud" > application.yml
git add application.yml
git commit -m "First external configuration"Feel free to use either a local repository or a remote one. For convenience, I'm using a remote repository that you can find on GitHub.
Finally, we can instruct our Config Server to use our brand new Git repo as a source for the configuration data. We'll do that in application.properties or application.yml by specifying a path to the repository as value for the spring.cloud.config.server.git.uri property.
server:
  port: 8888

spring:
  application:
    name: config-server
  cloud:
    config:
      server:
        git:
uri: https://github.com/ThomasVitale/config-repo The Config Server will read data from the Git repo and serve them as Environment resources to the client applications.
3.4 Test config server
To test if the Config Server is working correctly, let's run it and visit the /application/default endpoint from the browser. The result should be something like this:
{
    "name": "application",
    "profiles": [
        "default"
    ],
    "label": null,
    "version": "942f1f8432fd763af18db13936e0a17b8ed113d8",
    "state": null,
    "propertySources": [
        {
            "name": "https://github.com/ThomasVitale/config-repo/application.yml",
            "source": {
                "greeting": "Hello Cloud"
            }
        }
    ]
}It's a good idea to write a small integration test to verify that the Git repository can be reached. We're going to use the power of the @SpringBootTest annotation to configure a web environment for testing. The @LocalServerPort lets us access the value chosen randomly for the port on which the test application is listening.
@SpringBootTest(webEnvironment = SpringBootTest.WebEnvironment.RANDOM_PORT)
class ConfigServerApplicationTests {

    @LocalServerPort
    private int port;

    @Autowired
    private TestRestTemplate restTemplate;

    @Test
    void defaultConfigurationAvailable() {
        ResponseEntity<Environment> entity = restTemplate
                .getForEntity("http://localhost:" + port + "/application/default", Environment.class);
        assertThat(entity.getStatusCode()).isEqualTo(HttpStatus.OK);
        assertThat(entity.getBody().getPropertySources().get(0).getSource().get("greeting")).isEqualTo("Hello Cloud");
    }

}4. Spring Cloud Config Client
In this section, we'll see how to use the Config Server to configure a Spring Boot application.
4.1 Set up project and dependencies
We're going to build a Greeting Service, which is nothing else than a simple Spring Boot application. On top of that, we'll need to define a dependency on spring-cloud-starter-config. Let's define it in the gradle.build file for our project (or pom.xml if using Maven).
plugins {
    id 'org.springframework.boot' version '2.6.0-M3'
    id 'io.spring.dependency-management' version '1.0.11.RELEASE'
    id 'java'
}

group = 'com.thomasvitale'
version = '0.0.1-SNAPSHOT'
sourceCompatibility = '17'

repositories {
    mavenCentral()
    maven { url 'https://repo.spring.io/milestone' }
}

ext {
    set('springCloudVersion', "2021.0.0-M3")
}

dependencies {
    implementation 'org.springframework.boot:spring-boot-starter-actuator'
    implementation 'org.springframework.boot:spring-boot-starter-web'
    implementation 'org.springframework.cloud:spring-cloud-starter-config'
    testImplementation 'org.springframework.boot:spring-boot-starter-test'
}

dependencyManagement {
    imports {
        mavenBom "org.springframework.cloud:spring-cloud-dependencies:${springCloudVersion}"
    }
}

test {
    useJUnitPlatform()
}4.2 Add controller
To verify the externalized configuration, we'll create a REST controller that returns a String whose value is defined through the greeting property.
@RestController
public class GreetingController {

    @Value("${greeting}")
    private String greeting;

    @GetMapping("greeting")
    public String getGreeting() {
        return greeting;
    }
}4.3 Define local configuration
Before moving forward, let's define some local configuration for the Greeting Service, including the server port and value for greeting.
server:
  port: 8080

greeting: "Hello Local!"4.4 Test local configuration
Let's go ahead, run the application, open a browser window, and visit http://localhost:8080/greeting. The result should be "Hello Local".
Perfect! Let's now use the configuration from the Config Server.
4.5 Configure config client
We need to instruct the Greeting Service application to contact the Config Server to fetch the relevant configuration. We do that in application.yml (or application.properties).
- Define the name of the application;
- Instruct Spring Boot to import configuration from the Config Server, if available;
- The URI where to contact the Config Server.
spring:
  application:
    name: greeting-service
  config:
    import: "optional:configserver:"
  cloud:
    config:
uri: http://localhost:88884.6 Test externalized configuration
It's time to verify that the Greeting Service is fetching its configuration from the Config Server. Let's start the application, open a browser window, and visit http://localhost:8080/greeting again. The result should now be: "Hello Cloud".
Super! We have just configured a Spring Boot application from an external, centralized place: the Config Server.
As you may have noticed, properties defined in the Config Server take precedence over the ones defined locally in the application. Indeed, the value returned by the GreetingController is the one defined in the repo backing the Config Server, not the one defined locally in the Greeting Service application.
5. Refresh Configuration at Runtime
A Spring application loads the configuration at startup time, but restarting the app is not always an option. Spring Cloud Config has a neat feature that allows us to refresh configuration at runtime whenever we commit a change to the repository backing the Config Server.
There are two key aspects regarding the refresh feature:
- the class for which we want to use a new value for a property should be annotated with the
@RefreshScopeannotation; - a
RefreshScopeRefreshedEventmust be sent to theApplicationContextto trigger the refreshing.
5.1 Refresh Scope
The @RefreshScope is a scope provided by Spring Cloud Config. Whenever a RefreshScopeRefreshedEvent is sent, Spring will recreate all refreshed-scope beans and reload the configuration for them.
In our case, we want to define the GreetingController as refreshed-scope, so that it will fetch the new value for the greeting property when the refreshing happens.
@RestController
@RefreshScope
public class GreetingController {

    @Value("${greeting}")
    private String greeting;

    @GetMapping("greeting")
    public String getGreeting() {
        return greeting;
    }
}5.2 Refresh Event
There are a few ways to send a RefreshScopeRefreshedEvent. A convenient one is provided by Spring Boot Actuator, which exposes a refresh endpoint to send such an event.
So, first of all, let's add the spring-boot-starter-actuator dependency to our Greeting Service.
Then, we need to enable the refresh endpoint from application.properties or application.yml.
management:
  endpoints:
    web:
      exposure:
include: refreshFinally, we can trigger the event by sending an empty POST request to http://localhost:8080/actuator/refresh.
5.3. Test configuration refresh
Let's see if the refresh feature is correctly working. First, let's make sure we have both the Config Server and the Greeting Service up and running.
Then, we open up the application.yml defined in the config-repo Git repository and change the value for the greeting property.
greeting: "Hello Refreshed Cloud"Remember to commit and push the change:
git add application.yml
git commit -m "Update greeting value"
git pushThe Config Server will pick the change up automatically, but not the Greeting Service. So let's open up a Terminal window and send an empty POST request to Greeting Service to trigger a refresh.
curl -d{} http://localhost:8080/actuator/refreshFinally, we can open a browser window and visit http://localhost:8080/greeting again. The result is now: "Hello Refreshed Cloud".
Good job!
6. Strategies for storing configuration properties
In the previous sections, we got a configuration server up and running, an application correctly configured by that server and a mechanism to refresh configuration at runtime. It's time to explore more advanced ways to manage configuration files in the Git repo.
Spring Cloud Config relies on three parameters to identify which properties should be returned to an application:
{application}: the name of the application as specified in thespring.application.nameproperty (like we did for Greeting Service).{profile}: one of the profiles listed in thespring.profiles.activeproperty.{label}: a discriminator defined by the specific Environment Repository back-end. In the case of Git, a label can be a commit id, a branch name, or a tag.
The Git repository can host a folder structure using different combinations involving the previous parameters. An example follows.
/{application}/application-{profile}.yml
/{application}/application.yml
application-{profile}.yml
application.ymlIn our repo, we might have a structure like the following, containing different values for different applications and profiles.
/greeting-service/application-staging.yml
/greeting-service/application.yml
application-prod.yml
application.ymlGo ahead and try updating your repo with different properties file, as shown above, having different values for the "greeting" key. If you use a subfolder for each application, remember to set the spring.cloud.config.server.git.search-paths property in the Config Server configuration, otherwise it will only consider the files in the root folder.
server:
  port: 8888

spring:
  application:
    name: config-server
  cloud:
    config:
      server:
        git:
          uri: file://${user.home}/config-repo
search-paths: '{application}'Then try running the Greeting Service with different profiles active and verify the result. You can find an example of the config repo I used throughout the article here.
Conclusion
A centralized configuration server is useful in a cloud environment to configure multiple applications and services from one place.
Spring Cloud Config Server allows us to set up a configuration server in zero time, and back it up with different repositories. In this tutorial, we have learned how to use Git to store properties files.
A Spring Boot application can fetch configuration properties from a config server thanks to Spring Cloud Config Client. The configuration returned is filtered according to the application name, the active Spring profiles, and, if present, a label identified by the specific Environment Repository.
Have you had any experience managing configuration in the cloud? Would you like to share your experience? I'd like to hear about it, leave a comment or let me know on Twitter!
Resources
If you're interested in cloud native development with Spring Boot and Kubernetes, check out my book Cloud Native Spring in Action.