Retrieval Augmented Generation with Docling, Java and Spring AI
Learn to build a Retrieval Augmented Generation system in Java using Spring AI and Docling for advanced, privacy-focused document processing.


Spring AI lets you infuse your Java applications with Generative AI (GenAI) capabilities and build Retrieval Augmented Generation (RAG) flows to incorporate dynamically external knowledge sources into the generation process. That's a key step for letting large language models (LLMs) answer questions or make decisions based on your own data. For example, you might want to incorporate PDF documents, web pages, PowerPoint presentations, Markdown text files, images, or even audio recordings.
Docling is an open-source, privacy-focused solution for advanced document parsing. In a previous article, I described how Docling can convert and process any type of document and prepare them for use in GenAI and RAG scenarios. In that article, I also introduced the Arconia Docling library I built on top of Docling Java for using Docling directly within your Spring Boot applications.
In this article, I'll go one step further and show you how you can use Docling as part of your RAG system built with Spring AI.
The Ingestion Pipeline
Spring AI provides dedicated APIs to ingest data from various external knowledge sources into a vector store. They're all centred around a core, unified representation of data as a Document, which "contains text, metadata and optionally additional media types like images, audio and video".
We call the Ingestion Pipeline the process that loads and parses data, applies a series of transformations, and finally indexes and stores the data as Documents, typically in a vector database. The three main stages of the pipeline are modelled by three APIs, as shown in the picture.
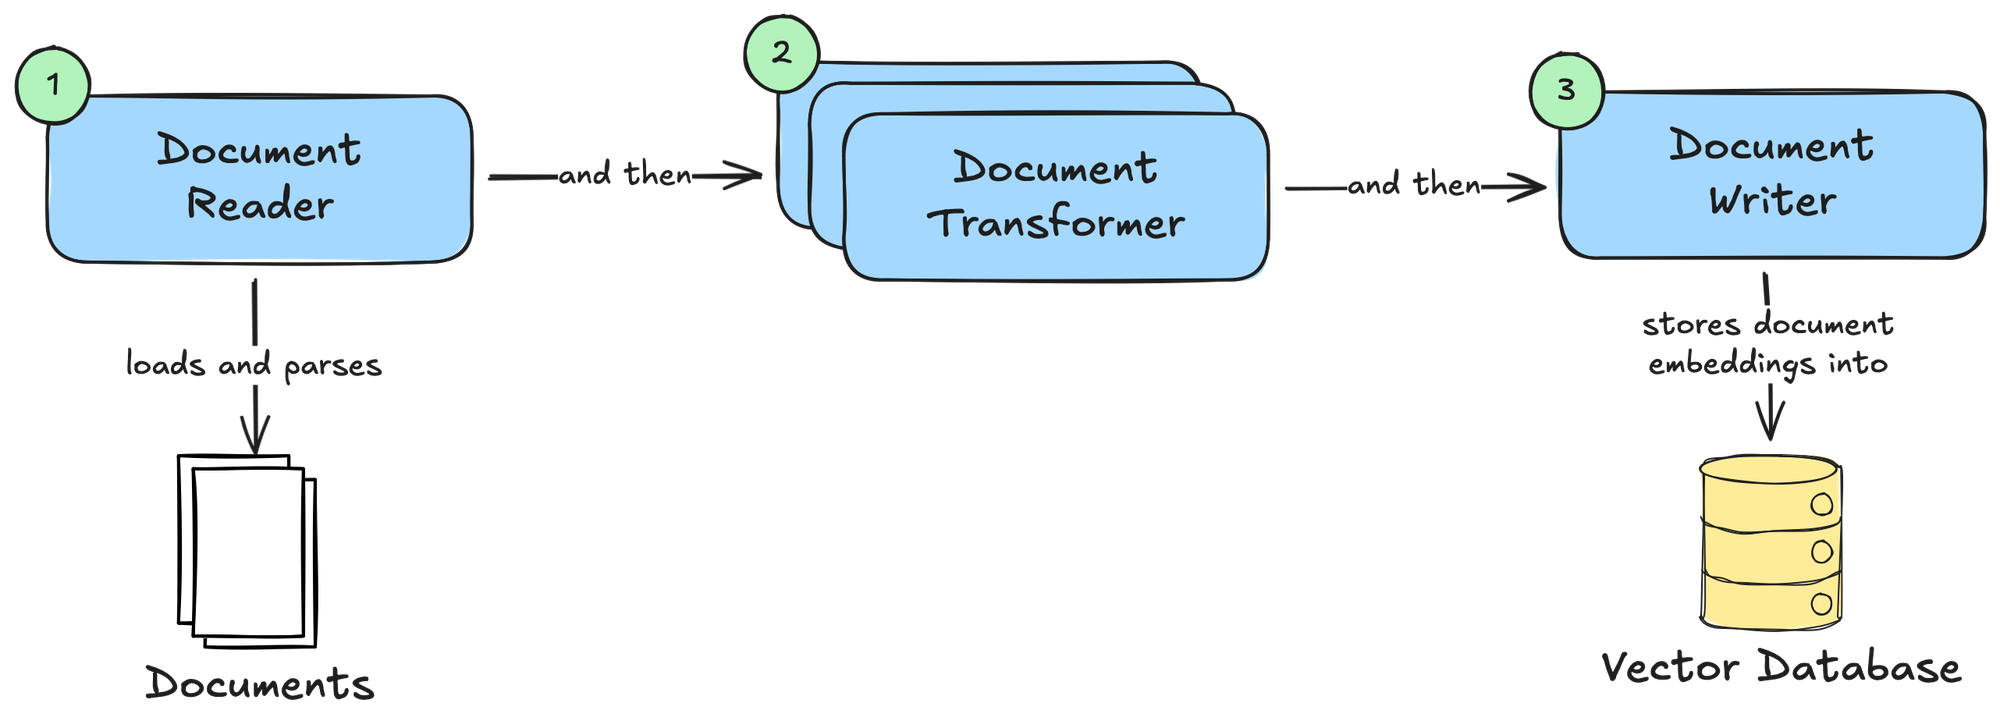
DocumentReaderis responsible for loading and parsing data from various sources into a collection of Documents.- Spring AI provides implementations such as
MarkdownDocumentReader(processes Markdown files),TikaDocumentReader(processes various files using the Apache Tika library), andJsoupDocumentReader(processes HTML pages using the JSoup library).
- Spring AI provides implementations such as
DocumentTransformercan process a collection of Documents and perform transformations to make them more suitable for use in RAG flows.- Spring AI provides implementations such as
TokenTextSplitter(splits text into chunks based on token count),KeywordMetadataEnricher(uses a generative AI model to extract keywords from a text and use them as metadata), andSummaryMetadataEnricher(uses a generative AI model to create summaries for documents and use them as metadata).
- Spring AI provides implementations such as
DocumentWriteris responsible for storing the Documents.- The most common implementation provided by Spring AI is
VectorStore, which stores Documents as embeddings in a vector database.
- The most common implementation provided by Spring AI is
Once the Documents are stored in a vector database, they can be integrated into a RAG flow.
Docling Document Reader
Spring AI provides several implementations of the DocumentReader API based on the type of data you need to load and parse. Docling can process any type of data. Wouldn't it be great to use Docling as the single solution for loading and parsing data in the Ingestion Pipeline?
In the latest version of Arconia, I have introduced a Docling Document Reader module that provides a Docling-based implementation of DocumentReader, enabling you to leverage all the benefits of Docling within your Spring AI projects.
The DoclingDocumentReader loads and parses data from HTTP or file sources, chunks them, and ultimately maps them to Spring AI Documents. You can use it in your application by adding the io.arconia:arconia-ai-docling-document-reader dependency. Optionally, you can include the Arconia Docling Dev Service to get a Docling instance automatically provisioned during development and testing (io.arconia:arconia-dev-services-docling).
In the next section, I'll start guiding you through a concrete example to demonstrate how the Docling Document Reader works.
Quick Start
Let's build a RAG system with Spring AI using Ollama as the model inference service, PostgreSQL as the vector database (using the PGVector extension), and Docling as the document processor. The entire system will run on your local machine based on open-source software. No subscription or cloud service will be needed.
1. Project Setup
For this example, I'll use Spring Boot 4.0, Spring AI 2.0, Gradle, and Java 25. Here's how the dependencies section of your build.gradle file should look:
dependencies {
	implementation "io.arconia:arconia-ai-docling-document-reader"

	implementation "org.springframework.ai:spring-ai-starter-model-ollama"
	implementation "org.springframework.ai:spring-ai-starter-vector-store-pgvector"
	implementation "org.springframework.ai:spring-ai-rag"

	implementation "org.springframework.boot:spring-boot-starter-webmvc"

	developmentOnly "org.springframework.boot:spring-boot-devtools"
	testAndDevelopmentOnly "io.arconia:arconia-dev-services-docling"
	testAndDevelopmentOnly "io.arconia:arconia-dev-services-ollama"
	testAndDevelopmentOnly "io.arconia:arconia-dev-services-postgresql"

	testImplementation "org.springframework.boot:spring-boot-starter-webmvc-test"
	testRuntimeOnly "org.junit.platform:junit-platform-launcher"
}

dependencyManagement {
	imports {
		mavenBom "io.arconia:arconia-bom:0.22.0"
		mavenBom "org.springframework.ai:spring-ai-bom:2.0.0-M2"
	}
}
Ollama is an open-source platform for running model inference services locally, keeping your data private. It's available as a native application for macOS, Linux, and Windows. Follow the download instructions to install Ollama. It includes built-in GPU acceleration, so performance will vary depending on the resources available on your computer.
Using Ollama, you can run any large language model locally, choosing from the many options available in the model library. We will use open-source models from the IBM Granite family.
2. Configuring the Model Inference Service
We'll need two different models for our application:
- an embedding model to convert our documents to embeddings, which can be stored in a vector database;
- a chat model to power our RAG system so that we can ask questions about our documents.
We will use the granite4:3b as the chat model and granite-embedding:278m as the embedding model.
You can specify both via configuration properties in the application.yml or application.properties file of your application. You can also instruct Spring AI to download the models for you via Ollama in case they're not already available on your machine.
spring:
  ai:
    ollama:
      init:
        pull-model-strategy: when-missing
      chat:
        model: granite4:3b
      embedding:
        model: granite-embedding:278m
3. Configuring the Vector Store
Next, we need to configure the vector store, which will persist the embeddings for the Documents processed by the Ingestion Pipeline. That’s a fundamental prerequisite for the RAG system to query data based on its meaning (semantic search).
In this example, we'll use PostgreSQL with the PGVector extension. The granite-embedding:278m model we configured earlier generates vectors with 768 dimensions. You can specify that for PGVector via configuration properties in the application.yml or application.properties file of your application, as well as the nearest-neighbour algorithm to use when performing a semantic search. In this case, we'll use the Hierarchical Navigable Small World (HNSW) algorithm. You can also instruct Spring AI PGVector to initialise the schema for you.
Since a dependency on Spring AI PGVector is detected in the classpath, Arconia PostgreSQL Dev Service will use a PostgreSQL image with the PGVector extension included, out of the box.
spring:
  ai:
    vectorstore:
      pgvector:
        dimensions: 768
        index-type: hnsw
        initialize-schema: true
4. Building the Ingestion Pipeline
It's time to build the Ingestion Pipeline. We will do that in two stages:
- Use the
DoclingDocumentReaderto load, parse, and chunk data into a collection of Documents. - Store the Documents in a
VectorStore, which in our case is PostgreSQL.
For this example, we'll implement the Ingestion Pipeline to run during application startup. Feel free to use the same story.pdf file used in the example.
@Component
class IngestionPipeline {

    private final DoclingServeApi doclingServeApi;

    private final VectorStore vectorStore;

    IngestionPipeline(DoclingServeApi doclingServeApi, VectorStore vectorStore) {
        this.doclingServeApi = doclingServeApi;
        this.vectorStore = vectorStore;
    }

    @PostConstruct
    void run() {
        Resource file = new ClassPathResource("documents/story.pdf");

        List<Document> documents = DoclingDocumentReader.builder()
                .doclingServeApi(doclingServeApi)
                .files(file)
                .build()
                .get();

        vectorStore.add(documents);
    }

}
When the application starts, the Ingestion Pipeline will be triggered, resulting in the vector store being populated with embeddings generated from the Documents processed by Docling.
You might have noticed that I haven't used any DocumentTransformer in the Ingestion Pipeline. That's because for this example I didn't need any extra transformation since Docling takes care of chunking the documents already. By default, it uses a hierarchical chunking strategy. If you'd like to rely on a hybrid chunking strategy which takes into account the tokenisation of the content, you can specify HybridChunkerOptions via the chunkerOptions() method when building a DoclingDocumentReader instance.
5. Building the RAG Flow
Once we have populated the vector store, we can build a RAG flow using that data, adding context to our interactions with a chat model. In particular, we'll implement an HTTP endpoint we can call to ask questions about the document we ingested in the previous step.
For this part, we'll need two main APIs:
- The
ChatClientfor interacting with a chat model. - The
RetrievalAugmentationAdvisorfor dynamically incorporating relevant data into the chat prompt from the vector store. This is the key component in Spring AI implementing the Retrieval Augmented Generation pattern.
@RestController
class ChatController {

    private final ChatClient chatClient;

    ChatController(ChatClient.Builder chatClientBuilder, VectorStore vectorStore) {
        this.chatClient = chatClientBuilder
            .defaultAdvisors(RetrievalAugmentationAdvisor.builder()
                .documentRetriever(VectorStoreDocumentRetriever.builder()
                    .vectorStore(vectorStore)
                    .build())
                .build())
            .build();
    }

    @GetMapping("/chat")
    String chat(String question) {
        return chatClient
                .prompt(question)
                .call()
                .content();
    }

}
The RetrievalAugmentationAdvisor intercepts a request to the chat model and augments the request prompt with information fetched from the vector store based on its relevance to answering the user's question.
6. Running the Application
It's time to see the example in action. First, make sure you have a container runtime available on your machine, such as Podman or Docker, since that's required for the Arconia Dev Services to work. Also, ensure Ollama is up and running. Then, fire up your app using the standard Spring Boot command for Gradle:
./gradlew bootRun
Or, if you prefer using the Arconia CLI:
arconia dev
When you run the application, Arconia Dev Services will automatically start a local Docling Serve instance using Testcontainers and configure the application to connect to it. Similarly, it will start a PostgreSQL database with the PGVector extension. If a native Ollama service is detected running on your machine, it will be used. Otherwise, Arconia Dev Services will automatically start an Ollama container as well.
7. Chatting with the RAG System
Let's verify the application is working as expected. For this example, I'll use httpie, a command-line HTTP client that makes it easy to interact with HTTP APIs.
From a Terminal window, call the /chat endpoint with a question you'd like to ask about the document ingested previously.
http :8080/chat question=="What's Iorek's dream?"
You should get an answer similar to the following, which the chat model generates based on the relevant data retrieved from the vector store.
Iorek dreams of one day going on an adventure around the North Pole and seeing the Northern Lights.
Conclusion
In this article, I introduced the new Docling Document Reader, offered by Arconia, which integrates Docling and Spring AI to build a RAG system.
The main benefit of this solution is that Docling supports a variety of document types, it's open source, and can run fully on-premises. That means all your data will stay private! Furthermore, you don't need to configure multiple Document Readers based on the document type, since Docling can parse any document type. Finally, Docling can also chunk your documents and make them ready for RAG scenarios, simplifying the implementation of the Ingestion Pipeline.
This was only the beginning! I plan to further extend and improve the integration, so I'd like to hear your feedback if you give this a try. Thank you!
Are you using Docling? What's your current experience with processing documents when building RAG systems? I'd love to hear from you! Share your experience on Bluesky or LinkedIn. And if you'd like to contribute to the Arconia framework, feel free to reach out on our GitHub project!
First version published on December 14th, 2025.
Cover picture from Pexels.